
Customisable (made-to-order) products
Let buyers personalise an item — choose a size, pick options, add text, upload a photo — with each choice adjusting the price. Build the options, set dependencies, and require approval before charging.
A customisable item lets a buyer personalise what they're ordering before they add it to their basket: pick a size, choose from a set of options, type a message, or upload a photo — with each choice nudging the price up or down. Use it for anything made to order: an engraved gift, a printed canvas, a custom cake, or a made-to-spec jigsaw.
Everything a standard item has (media, categories, fulfilment, stock) still applies. Customisable just swaps the single price for a base price plus a set of options the buyer works through.
Switch the item to Customisable
- Open the item in the editor (Items → New item, or Edit item on an existing one).
- In the Product type card near the top, choose Customisable.
- The simple price panel is replaced by the custom pricing builder. The rest of the editor — media, categories, fulfilment, stock — is unchanged.
Tip: You can flip back to Standard item at any time. Your options are kept while you're in the editor, but saving as Standard clears them — so only switch back if you really mean to drop the customisation.
Set a base price
The custom pricing box starts with a Base price, set to £0.00 by default. This is what the item costs before any options are added. Set it to the starting price of the cheapest possible configuration — every option's price is added on top of this.
Build the options
Each option is one decision the buyer makes. Click Add option and pick its type:
- Choice — pick exactly one (e.g. Size: Small / Medium / Large).
- Multiple choice — pick several, with an optional min and max (e.g. "Pick 1–2 extras").
- Image upload — the buyer uploads one or more photos.
- Custom text input — a free-text box (e.g. an engraving message), with optional minimum and maximum characters (leave either blank for any length).
- Number — a numeric answer.
- Date — a date (e.g. an event date).
Beside Base price, use the Lead time switch if the product has a predictable made-to-order schedule. When it is on, choose Days or Hours (Days is the default) and add an optional base lead time. This is the starting estimate before the buyer chooses any extras.
When lead time is off, LocalFor.Me hides all lead-time fields in the editor and doesn't show lead-time messages to buyers for that item.
For each option you can set:
- a label (what the buyer sees),
- whether it's required,
- optional help text,
- an optional price added when the option is used (for Choice / Multiple choice, each individual choice carries its own price instead),
- if lead time is on, an optional lead time in your chosen unit. Leave it blank if the choice doesn't add time; the base lead time and selected options are added together for the buyer.
Tip: You can also attach a small image to each choice — handy to show a swatch or a shape. It's optional and purely illustrative.
Drag to reorder
Grab the grip handle on the left of any option (or any choice within it) and drag to reorder. The order here is the exact order buyers see, top to bottom — so put the decision that drives the others (like Size) first.
Make one option depend on another (the jigsaw)
This is the powerful bit. Say you sell a custom jigsaw where the buyer:
- chooses a Size,
- chooses the Number of pieces — but the big counts are only available on the larger sizes,
- chooses the Shape of the pieces — some shapes only on certain sizes,
- uploads a photo to print.
To express "1000 pieces is only available on Large":
- Add the Size option first (Small, Medium, Large), then add Number of pieces below it.
- On the Number of pieces option, set Depends on → Size. This tells the option its choices are unlocked by the buyer's Size pick.
- On each piece-count choice, use Available when to tick the sizes that unlock it. Tick only Large on the 1000 choice; tick Small and Medium on the smaller counts.
Now when a buyer picks Small, the 1000 choice is hidden; pick Large and it appears. The dependent option stays hidden entirely until the buyer has answered the option it depends on — and if a branch leaves it with no applicable choices, it disappears rather than blocking as an unanswerable required field. Do the same for Shape to gate Spiral to Large only.
Note: If a buyer changes an upstream choice so a downstream pick is no longer valid, we automatically drop the now-invalid selection so the price stays honest.
Multiple choice with limits
For an option like Extras, choose Multiple choice and set min and max (e.g. min 1, max 2). The buyer must pick at least the minimum and can't exceed the maximum — the configurator enforces it and so does the server.
Text length limits
On a Custom text input option, set Min characters and Max characters (each defaults to any). Leave both blank for an unrestricted text box. The buyer sees the limit next to the field, the browser enforces it, and the server rejects text that is too short or too long.
Advanced text options (fonts + live preview)
Turn on Allow advanced options on a Custom text input option to let the buyer choose how their text looks. Pick which fonts and styles to offer:
- Fonts — eight standard, clearly different faces (Arial, Georgia, Times New Roman, Courier New, Trebuchet MS, Verdana, Impact, Brush Script). At least one must stay selected.
- Styles — Regular, Bold, Italic or Bold italic. At least one must stay selected.
The editor shows a Preview panel as you author, and the buyer sees the same preview updating live as they type and switch font or style. The chosen font and style are saved on the order line, so you know exactly what to make.
Image-upload requirements
On an Image upload option you can require a minimum (and cap a maximum) number of photos, and set a minimum resolution (width × height in pixels) so the print comes out sharp. Buyers see the requirement next to the upload button (e.g. "min 1, at least 1500×1500px"). Uploads are accepted in JPG, PNG, WebP or HEIC (iPhone) up to 15 MB, stored privately, and shown to you on the custom order alongside the buyer's configuration.
Approval before charging (automatic for custom items)
Every custom item is held, not charged, at checkout. When the buyer orders, their card is authorised and you get a Custom order in Manage → Orders → Custom orders. Upload the buyer's photo/spec, send a mock-up (with an optional revised price), and the buyer approves or asks for changes. Payment is captured only once the design is approved — either automatically on their approval, or when you click Approve & charge. See Custom orders — mock-ups & approval for the full loop.
Save, then see what buyers see
Click Save — or Save & preview to jump straight to the buyer-facing listing (a Preview bar takes you back to editing). On the item's public page, buyers now get a Personalise your order panel: they work down your options, watch a running total update as they choose, and see any enabled customisation lead time accumulate. The headline price shows From £NN — the cheapest path to buy (base price plus the cheapest required options) — and switches to the live total the moment they pick anything. They can't add to basket until every required option is answered.
The same panel runs on Kiosk: a customisable product on your scan-to-order menu shows its From £NN price and a Choose button that opens these exact options on the customer's phone. See Kiosk — scan-to-order.
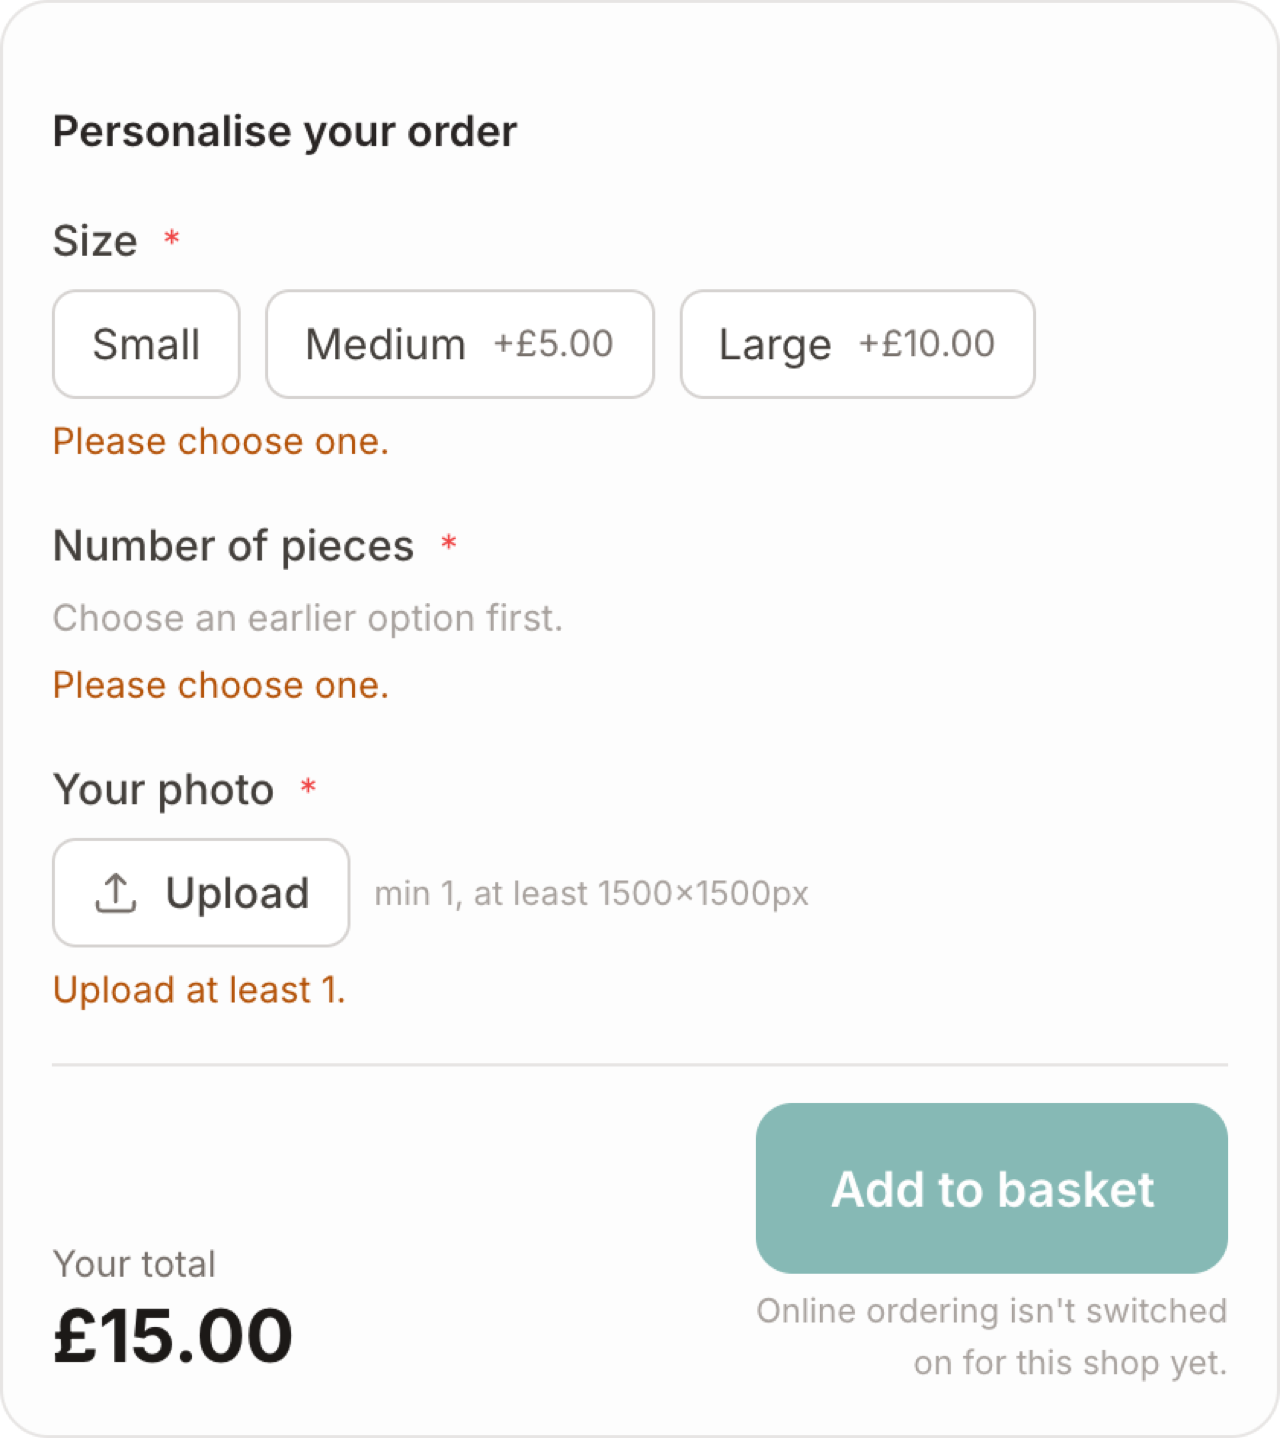
Important: Buyers can configure a custom item and see the price right away, but they can only actually pay once online ordering is switched on for the shop. Until then the panel shows "Online ordering isn't switched on for this shop yet." — the configuration and pricing all work; only the final checkout waits on payments being enabled. See Getting paid with Stripe Connect.