
Adding & editing an item
How to create a new item as a draft, fill in the editor fields, add your pricing and details, and save your listing.
Every product or service you sell on LocalFor.Me is an item. This guide walks you through creating one and filling in the editor.
Create a new item
- From your management dashboard, open the Items page.
- Click New item (top right).
- We drop you straight into the editor — there's no separate "blank form" step. As soon as you add anything (a name, a photo, a price…) it's saved as a draft, visible only to you until you publish it.
Tip: Once you've started an item, you can leave and come back later — your in-progress draft waits under the Draft · In progress section of the Items page. If you open New item but enter nothing and leave, the empty draft is discarded automatically, so your list never fills up with blanks.
Add your media first
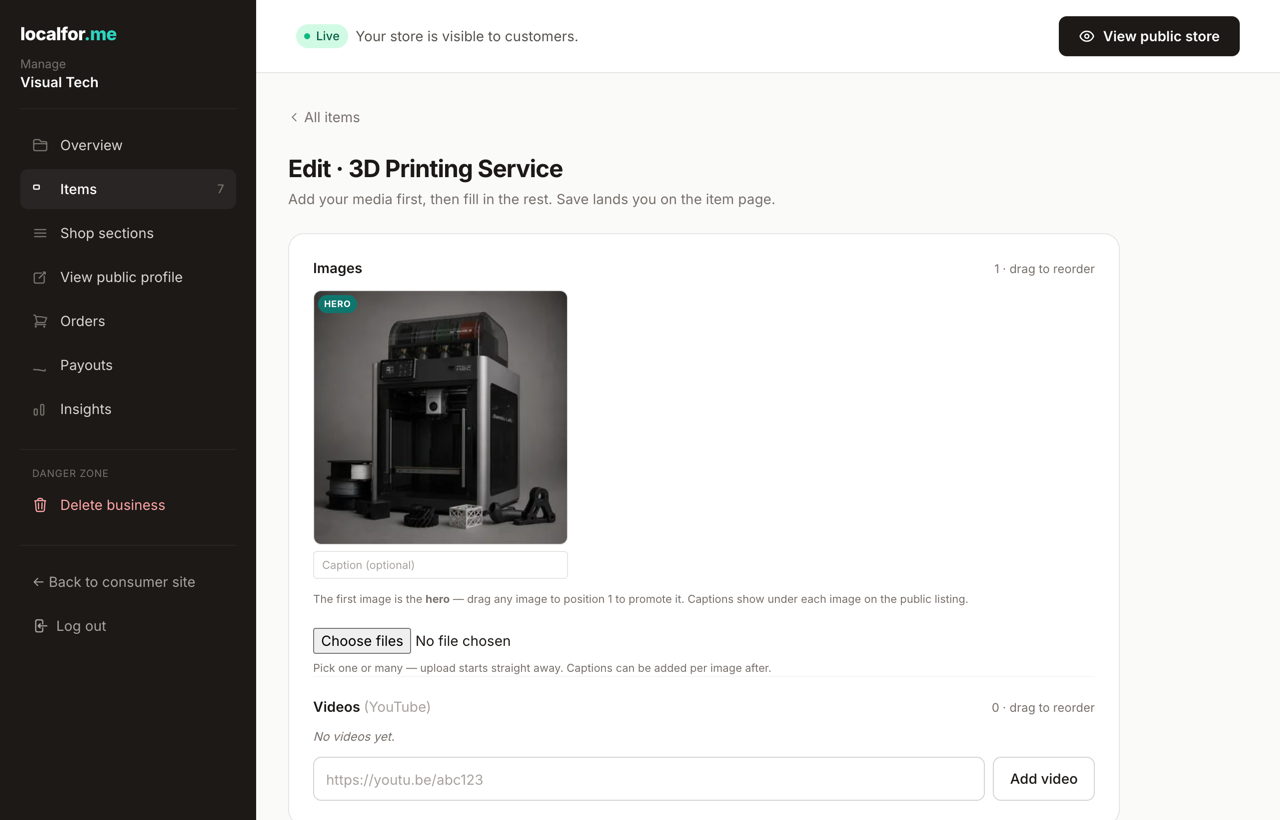
The editor is arranged so you add photos and video at the top, then fill in the rest. Use the media manager to upload images (you can select several at once) and paste YouTube links for video. The first image becomes your listing's hero thumbnail; drag to reorder.
Fill in the details
Below the media, the editor is grouped into cards. Working down them:
Details
- Name (required) — we automatically capitalise each word, so "english garden bouquet" becomes "English Garden Bouquet".
- Description — what it is and what's special about it.
- Search keywords — comma-separated words buyers might search (e.g. vegan, handmade, gluten-free). These boost how easily you're found.
- State — Draft, Active or Disabled (see the dedicated article on item status).
- Shop section — an optional section in your own storefront layout (e.g. "Bouquets", "Plants"). Leave it as Other to let the item group by its platform category.
Categories (required) — pick 1–5 platform categories buyers filter on, by searching or browsing (see the article on choosing categories).
Product type — leave as Standard item for a normal fixed-price listing, or choose Customisable to let buyers personalise it (pick a size, add a message, upload a photo) with each choice adjusting the price. See Customisable (made-to-order) products for the full walkthrough.
Pricing — add one price row, or several rows for sized/packaged options. Tick Enquire for price for bespoke work with no fixed price. (Customisable items use a base price plus options instead — see the linked article.)
Fulfilment & stock
- Fulfilment — overrides your business default (post / pickup / both) for just this listing.
- Payment — use your shop default, or set Card online / Cash on pickup for just this listing. Cash is collection-only and needs the Features add-on.
- Stock — leave blank for unlimited or for services; enter a number to track stock.
- SKU (optional) — your own product code.
- Schedule when this item is available — optionally limit the item to a time window, with daily/weekly/monthly/annual repeats.
Pricing in detail
Each price row has an optional label, optional description, a price, an optional lead-time note (e.g. "Made to order, 2 weeks") and an optional minimum order quantity. With two or more rows, your storefront shows "From £X". You must add at least one price or tick Enquire for price — the editor won't save otherwise.
Save
- Click Save at the bottom. You land on the read-only item page, which summarises everything; click Edit item there to return to the editor.
- Or click Save & preview to land on your storefront listing — exactly what shoppers see, including the live options configurator. A Preview bar at the top has a Back to editing button, so you can flip between tweaking options and seeing the result.
Note: Saving does not automatically publish your item. A new item stays in Draft until you publish it — see the next article.
Clone an item
Speed up variants and repeat listings: open an item and click Clone (next to Edit — it's also in the ⋯ menu on the Items list). The copy keeps the price, categories, section, photos, videos, tags, price tiers and the full custom-options setup, then opens straight in the editor as a new draft. Edit what differs and publish it. The original listing is untouched, and the clone shares the same image files, so it doesn't use extra storage.